本文共 6960 字,大约阅读时间需要 23 分钟。
如果了解springboot如何整合shiro可以跳过介绍
这里写目录标题
什么是Shiro
Apache Shiro是一个功能强大且易于使用的Java安全框架,它执行身份验证、授权、加密和会话管理。借助Shiro易于理解的API,您可以快速轻松地保护任何应用程序—从最小的移动应用程序到最大的web和企业应用程序。
Shiro的三大核心概念
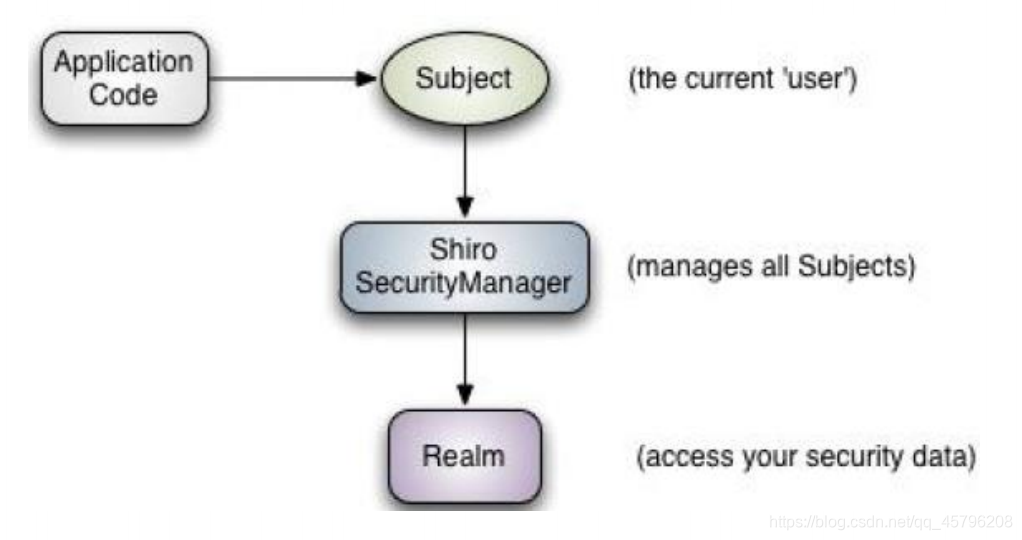
Subject:
主体,代表了当前“用户”,这个用户不一定是一个具体的人,与当前应用交互的任何东西都是Subject,如爬虫、机器人等;即一个抽象概念;所有Subject都绑定到SecurityManager,与Subject的所有交互都会委托给SecurityManager;可以把Subject认为是一个门面;SecurityManager才是实际的执行者。
SecurityManager:
安全管理器;即所有与安全有关的操作都会与SecurityManager交互;且它管理着所有Subject;可以看出它是shiro的核心, SecurityManager相当于spring mvc中的dispatcherServlet前端控制器。
Realm:
域,shiro从Realm获取安全数据(如用户、角色、权限),就是说SecurityManager要验证用户身份,那么它需要从Realm获取相应的用户进行比较以确定用户身份是否合法;也需要从Realm得到用户相应的角色/权限进行验证用户是否能进行操作;可以把Realm看成DataSource,即安全数据源。
Shiro功能介绍
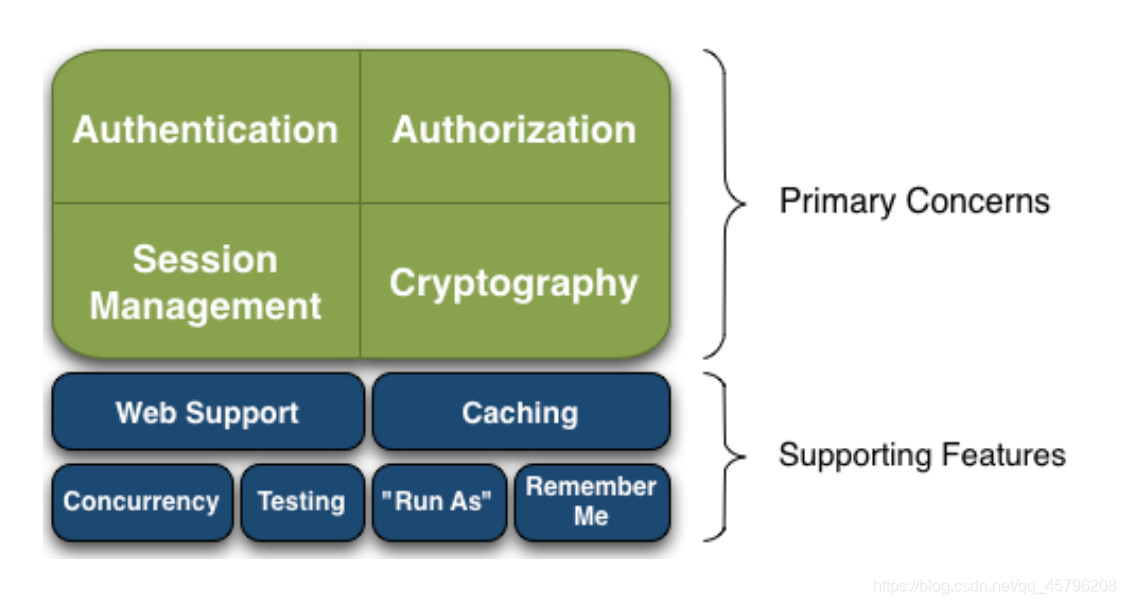
Authentication:
身份认证/登录,验证用户是不是拥有相应的身份;
Authorization:
授权,即权限验证,验证某个已认证的用户是否拥有某个权限;即判断用 户是否能进行什么操作,如:验证某个用户是否拥有某个角色。或者细粒度的验证某个用户对某个资源是否具有某个权限
Session Manager:
会话管理,即用户登录后就是一次会话,在没有退出之前,它的所有
信息都在会话中;会话可以是普通 JavaSE 环境,也可以是 Web 环境的Cryptography:
加密,保护数据的安全性,如密码加密存储到数据库,而不是明文存储;
Web Support:Web 支持,可以非常容易的集成到Web 环境;Caching:
缓存,比如用户登录后,其用户信息、拥有的角色/权限不必每次去查,这样可以提高效率;
Concurrency:
Shiro 支持多线程应用的并发验证,即如在一个线程中开启另一个线程,能
把权限自动传播过去;Testing:
提供测试支持;
Run As:
允许一个用户假装为另一个用户(如果他们允许)的身份进行访问;
Remember Me:
记住我,这个是非常常见的功能,即一次登录后,下次再来的话不用登录了
Shiro面试题(待补充)
Springboot整合Shiro
导入依赖
org.apache.shiro shiro-spring 1.7.1
配置javaConfig
三大核心对象ShiroFilterFactoryBean、DefaultWebSecurityManager、Realm
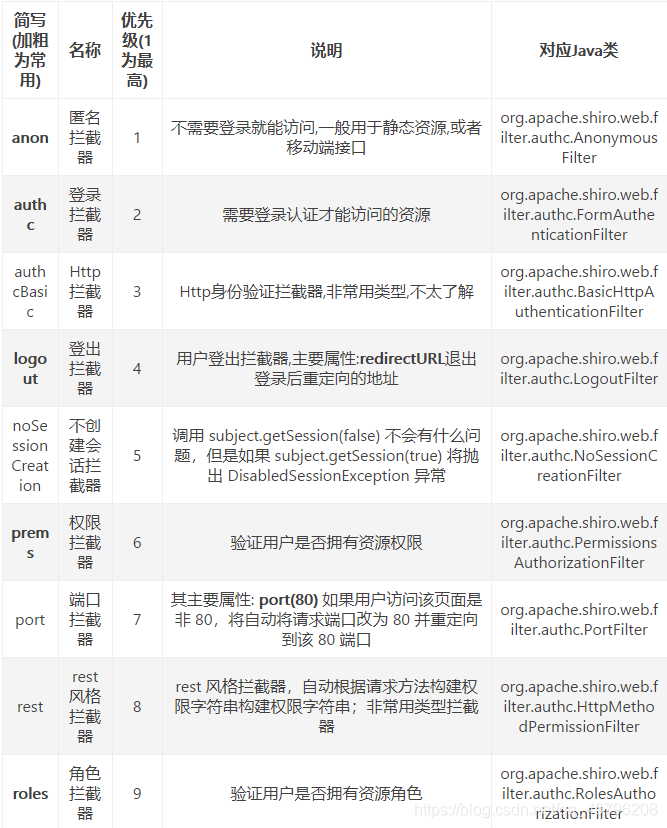
常用拦截器分类说明
javaConfig
@Configurationpublic class ShiroConfig { //ShiroFilterFactoryBean @Bean public ShiroFilterFactoryBean getShiroFilterFactoryBean(@Autowired DefaultWebSecurityManager securityManager) { ShiroFilterFactoryBean filterFactoryBean = new ShiroFilterFactoryBean(); filterFactoryBean.setSecurityManager(securityManager); Map filterChainDefinitionMap = new LinkedHashMap<>(); //拦截 filterChainDefinitionMap.put("/user/add", "authc"); filterChainDefinitionMap.put("/user/update", "authc"); filterChainDefinitionMap.put("/user/*", "authc"); filterChainDefinitionMap.put("/logout", "logout");//退出 /*filterChainDefinitionMap.put("/*","authc");*/ //授权 filterChainDefinitionMap.put("/user/add","perms[user:add]"); filterChainDefinitionMap.put("/user/update","perms[user:update]"); //设置登录的请求 filterFactoryBean.setLoginUrl("/toLogin"); //设置未授权页面 filterFactoryBean.setUnauthorizedUrl("/unauth"); filterFactoryBean.setFilterChainDefinitionMap(filterChainDefinitionMap); return filterFactoryBean; } //DefaultWebSecurityManager @Bean public DefaultWebSecurityManager getDefaultWebSecurityManager(@Autowired UserRealm userRealm) { DefaultWebSecurityManager securityManager = new DefaultWebSecurityManager(); securityManager.setRealm(userRealm); return securityManager; } //Realm @Bean public UserRealm userRealm() { return new UserRealm(); }} Realm
创建UserRealm继承AuthorizingRealm实现doGetAuthorizationInfo()、doGetAuthenticationInfo()方法
从数据库中拿到用户信息,这里需要整合MyBatis、Druid相关依赖,具体的springboot整合MyBatis的代码这里就赘述了,如果自己联系,可以不从数据库中获取数据,可以自己直接设定默认的username和password
 perm是该用户的权限可以通过authorizationInfo.addStringPermissions();方法授权
 public class UserRealm extends AuthorizingRealm { @Autowired UserService userService; @Override protected AuthorizationInfo doGetAuthorizationInfo(PrincipalCollection principalCollection) { SimpleAuthorizationInfo authorizationInfo = new SimpleAuthorizationInfo(); //authorizationInfo.addStringPermission("user:add"); Subject currentUser = SecurityUtils.getSubject(); /** * 通过session取值 */ /*Session session = currentUser.getSession(); String username = (String) session.getAttribute("username"); System.out.println(username); User user = userService.getByUsername(username); authorizationInfo.addStringPermission(user.getPerm()); System.out.println(user.getPerm());*/ /** * 通过principal取值 */ String username = (String) currentUser.getPrincipal(); System.out.println(username); User user = userService.getByUsername(username); System.out.println(user.getPerm()); String[] perms = user.getPerm().split(","); ArrayList permList = new ArrayList(); for (String perm : perms) { permList.add(perm); } authorizationInfo.addStringPermissions(permList); System.out.println("执行了======>授权"); return authorizationInfo; } @Override protected AuthenticationInfo doGetAuthenticationInfo(AuthenticationToken authenticationToken) throws AuthenticationException { System.out.println("执行了======>认证"); UsernamePasswordToken token = (UsernamePasswordToken) authenticationToken; User user = userService.getByUsername(token.getUsername()); if (user == null) { return null; } //密码可以加密 //密码认证,shiro加密 return new SimpleAuthenticationInfo(user.getUsername(), user.getPassword(),""); }} Controller
@Controllerpublic class MyController { @RequestMapping("/toLogin") public String toLogin() { return "login"; } @RequestMapping({ "/","/index"}) public String toIndex(Model model) { model.addAttribute("msg","Hello,Shiro"); return "index"; } @RequestMapping("/user/add") public String addUser() { return "user/add"; } @RequestMapping("/user/update") public String updateUser() { return "user/update"; } @PostMapping("/login") public String login(String username, String password, Model model) { UsernamePasswordToken token = new UsernamePasswordToken(username, password); Subject currentUser = SecurityUtils.getSubject(); try { currentUser.login(token); Session session = currentUser.getSession(); session.setAttribute("username", username); return "index"; } catch (UnknownAccountException uae) { model.addAttribute("msg", token.getPrincipal() + "用户名不匹配"); return "login"; } catch (IncorrectCredentialsException ice) { model.addAttribute("msg", token.getPrincipal() + "密码错误"); return "login"; } } @ResponseBody @RequestMapping("/unauth") public String unAuth() { return "未经授权"; } @RequestMapping("/logout") public String logout() { return "/login"; }} 前端页面这里就不献丑了,大家自由发挥
Shiro实现记住我功能
Shiro整合thymeleaf
导入依赖
com.github.theborakompanioni thymeleaf-extras-shiro 2.0.0
HTML页面命名空间
使用举例
转载地址:http://hcbmz.baihongyu.com/